Rust Admin Radar/ESP Command and Information
Hey there, Rust enthusiasts! I’ve got some fantastic news for y’all! The Rust team has been working hard on new built-in admin radar commands, and I’m here to break down the exciting updates that are just around the corner. So let’s dive into the news of Rust’s built-in admin radar improvements.
Information on Rust Admin Radar/ESP Command
Jarryd Campi, one of the talented developers behind Rust, has been quite busy lately, pushing a bunch of updates on the /main/esp_improvements branch. With these enhancements, server admins will have access to a more comprehensive set of tools when in debug camera mode or spectating a player. These changes are coming to the game after the force wipe on May 4th so mark your calendars!
Concise List of the commands mentioned:
| Command | Default Value | Description |
|---|---|---|
| espcanvas.colourcodeteams | false | Allows admins to color-code teams, making it easier to differentiate between different groups of players. This does require custom development to accomplish to assign unique team IDs |
| espcanvas.disableocclusionchecks | false | Lets admins see through walls and other occluding objects, giving them an extra edge when monitoring players and enforcing rules. |
| espcanvas.overridemaxdisplaydistance | 0 | Customizes the maximum display distance of ESP elements. |
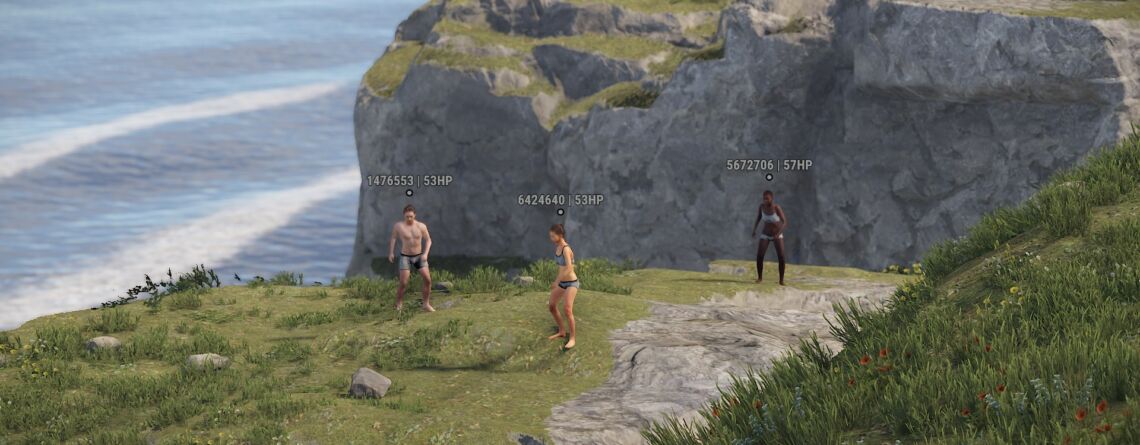
| espcanvas.showhealth | false | Toggles the visibility of player health while spectating or using the debug camera. |
How To Enable The Admin Radar:
espcanvas.overridemaxdisplaydistance (0) anything higher than 0 will essentially enable the ESP visual to appear when you’re in debug cam/spectate. I would recommend 200-500 for a decent distance range.
Easy Keybind
This all-in-one keybind allows you to easily toggle this open on/off with the press of f9 (or any key you wish to change that to) and will automatically enter debug cam, and enable all of the ESP settings for you! – Thanks Tyrone/Irish
bind f9 ~meta.exec "debugcamera" "espcanvas.colourcodeteams true" "espcanvas.disableocclusionchecks true" "espcanvas.overridemaxdisplaydistance 500" "espcanvas.showhealth true" "espcanvas.maxnameplates 64"; meta.exec "espcanvas.colourcodeteams false" "espcanvas.disableocclusionchecks false" "espcanvas.overridemaxdisplaydistance 0" "espcanvas.showhealth false" "espcanvas.maxnameplates 0" "debugcamera"
Color Command ESPCanvas
One of the coolest features being introduced is the ESPCanvas.ColourCodeTeams command. This bad boy allows you to color-code teams, making it easier for admins to differentiate between different groups of players. You can set team IDs for each color, like GreenTeamId = 1000 or BlueTeamId = 3000. Ain’t that neat?
Peeking Behind the Curtain
Another game-changer is the espcanvas.disableocclusionchecks (false) command. This powerful tool lets admins see through walls and other occluding objects, giving them an extra edge when monitoring players and enforcing server rules.
Maximum Display Distance & Player Health
The espcanvas.overridemaxdisplaydistance (0) and espcanvas.showhealth (false) commands add even more versatility to the admin experience. With these, admins can customize the maximum display distance of ESP elements and toggle the visibility of player health, all while spectating or using the debug camera.

Admin Radar: A Thing of the Past?
Until now, most Rust server admins have relied on the popular Admin Radar plugin for their in-game radar needs which does a fantastic job of supplying several bits of information about a player, including even a visualizer of where the player is looking at, who is talking with a visual indicator and more! However, with these new built-in admin radar commands, we might be able to enjoy similar functionality without any additional plugins! That’s a win-win situation, folks.
Enjoy this guide? Browse our others like the Missile Silo Guide!